OTHER PAGES

Friday, December 31, 2010

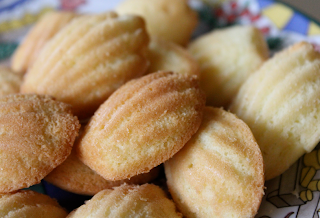
Lavender Madeleines

Happy New Year's Eve everyone! Has everybody decided on their New Year's goals? Usually I always forget about them until after New Years, but this time I thought of making goals to improve my baking. My first goal is.....to make a successful batch of french macarons. After countless errors, I'm determined to make these tasty little French sweets. My second goal is to make a baked alaska. I'm not sure why, but I just love the idea of ice cream, cake, and fluffy meringue on fire! I don't really have a third goal, or at least not yet, but I'll probably think of something.

Also on my list of things I wanted to make was madeleines! My friends got me a madeleine pan for Christmas (thanks guys!) so this morning I decided to make some madeleines. While I was cleaning out the pantry I found some dried lavender, so I made some Lavender Madeleines! They're the perfect finger food for a New Year's party. Enjoy!


Lavender Madeleines 
Adapted from Purple Foodie
Ingredients:
3/4 cup flour
½ tsp baking powder
5 tbsp butter
2 tsp dried lavender, crushed/pulsed
2 eggs
1/3 cup sugar
1 tsp lemon juice

Directions:
1. In a saucepan, melt the butter and lavender. Allow to cool, then strain. 
2. Sift together flour and baking powder. 
3. In a separate bowl whisk eggs and sugar until thick, about 3 minutes. Add lemon juice.
4. Fold in flour mixture, and then lavender butter. 
5. Transfer batter into a piping bag. Allow to rest in the refrigerator for 3 hours. (I skipped this step)
6. Preheat oven to 400˚F and liberally butter a madeleine pan
7.  Pipe batter into pan and bake for 10 minutes.

Monday, December 27, 2010

Daring Bakers: Christmas Stollen

This month's challenge was hosted by Penny over at Sweet Sadie's Baking. She chose Christmas Stollen as this month's recipe. I've never even tried stollen, so I was excited to try making it. When I looked over the recipe, it reminded me of a fruit cake in bread form. I'm not much a fan of the whole fruit and nut combo, so I chose to use dried cranberries and no nuts instead. I love the wreath-shaped look of stollen, but had a little trouble shaping it at first. Mine didn't turn out perfect, but it was still tasty.  Actually, my dad loved it, and even before I put the powdered sugar layer on he had already eaten some!


Recipe over at Sweet Sadie's Baking

Saturday, December 25, 2010

Merry Christmas!

Merry Christmas everyone! I hope you are enjoying opening presents, sipping steaming mugs of hot cocoa, and spending time with family and friends! Okay, well that's all....So hope everybody's enjoying their breaks and Christmas day!

Monday, December 20, 2010

Oatmeal Cranberry Cookies

Sorry I haven't posted in such a long time. I like the holidays, but don't you guys think it becomes way too stressful? Buying the perfect gift, decorating the house, and semester exams. Ugh, don't even get me started about exams! Mine isn't until After winter break, so instead of relaxing I have to study! Yuck. At least I get more time to study, though, right?
Do you see these cookies here? These aren't any old cookies. They're Oatmeal Cranberry Cookies..in other words the carefree, relaxing, melt-your-worries-away cookies. Buttery soft oatmeal cookie dough and tart dried cranberries are the perfect match. Who ever invented this combination was a genius!

Oatmeal Cranberry Cookies
Adapted from Flour 
Ingredients:
1 cup butter, room temperature
3/4 cup sugar
1 cup packed brown sugar
2 eggs
1 3/4 cup flour
1 3/4 cup rolled oats
1 teaspoon baking soda
1 teaspoon salt
1 teaspoon cinnamon
1/4 teaspoon ginger
1 1/2 cups dried cranberries

Directions:
1. In a bowl, beat the butter and sugars until light and creamy. Beat in the eggs until combined
2. In a separate bowl, combine the flour, oats, baking soda, salt, cinnamon, and ground ginger, whisking until combined
3. Mix the flour mixture in to the butter mixture.
4. Stir in the cranberries
5. Place the dough in an airtight container, and place in the fridge for at least 3 hours
6. Preheat oven to 350˚F
7. Drop rounded tablespoons of dough on a cookie sheet, and bake for 16 minutes or until edges are golden brown
8. Enjoy!

Wednesday, December 15, 2010

Peanut Butter Cookie and My First Marathon!

Sorry it's been a while since I last posted. I've been extremely tired lately, or at least my legs have because....I did my first marathon this past Sunday! I know you probably think I'm crazy. Why would any fifteen year old girl ever want to wake up at 3 am on a Sunday morning to run 26.2 miles?! I'm not sure. Call me crazy! :)

The marathon was quite a lot of fun. Yes, I know that probably doesn't sound right, calling a 26 mile run "Fun", but it actually was. There were tons of different costumes from Avatar and Darth Vader to thousands of Santa's helpers! Do you remember that North Shore swim I did? Maybe not, but anways my friend who swam it with me also did the marathon too! We didn't train..yes, I know we probably should've, but we were fine actually. We finished with a time of 5 hours 15 minutes! Yay! I was so happy when I crossed the finish line, it felt amazing to sit down too. I never knew how tired legs could be. Or just how tasty lunch or breakfast or whatever meal I ate after could taste! First I'll show you some of the pictures, then we'll talk cookies.
Look at those zori! They're wooden! Imagine running 26 miles with wooden slippers! OMG Amazing!
Near the base of Diamond Head. I think this was about mile 10.

Near one of the water stations. About mile 21ish

Go super girl run!

Darth Vader nearing the finish. Woo hoo!


My friends on the left in the green, and I'm on the right with the white hat.

Do we look like we're dying? I definitely was. This picture was taken, courtesy of my dad, at mile 24 ish.

Now let's talk cookies. I know, a weird change. But when you've eaten 4 or 5 of these scrumptious little cookies after 26 miles, you'll know why I jumped straight to them. Pretty much everything tasted delicious after the marathon. But these cookies helped me re-gain all of those calories I burned up! I didn't bake them right after the marathon. Oh no, I would fallen in to the oven! But I did make these the day before and they were delicious. Yes, I know, I forgot to make the crisscross pattern, but despite their funny appearance, they were very good. Peanut buttery, yummy, delicious!


Peanut Butter Cookies
Adapted from Flour
Ingredients:
1 cup butter, room temperature
1 cup sugar
1 cup packed brown sugar
2 eggs
1 teaspoon vanilla extract
1 3/4 cups smooth peanut butter
2 3/4 cups flour
1 teaspoon baking soda
1/2 teaspoon salt

Directions:
1. In a bowl, cream the butter and sugars until light and creamy. Mix in the eggs, vanilla extract, and peanut butter
2. In a separate bowl whisk together the flour, baking soda, and salt
3. Mix the flour mixture in to the butter mixture until combined
4. Place dough in an airtight container in the fridge for at least 3 hours
5. Preheat oven to 350˚F
6. Drop rounded tablespoons of dough on a cookie sheet. Use a fork to make a crisscross pattern. (as you can see I forgot to do this...but they were tasty anyway!)
7. Bake for 18 minutes or until golden brown on the edges

Sunday, December 12, 2010

Winner of the Giveaway! and A Recipe for Molasses Spice Cookie

So first on the agenda is the winner of the giveaway. Did you know there aren't number on the sides of the comments? Well I didn't realize that, so good thing I didn't have to count very many because the lucky winner is... (picked using randomgenerator) ......drum roll please...:


Comment #7....Terri!

Congratulations Terri! I will be contacting you shortly so watch out for my email!! Thank you to everyone who participated! And I hope you all enjoy your holiday, and favorite dish of the season :)
Now, moving on to other important cookie matters. Look at these babies. They are packed with a delicious blend of spices to create a soft and chewy cookie perfect for giving away or eating all by yourself! As you can see they aren't covered in sugar...well oops. That's my bad, I meant to roll them in sugar. I even had the bowl full of sugar and everything. But uh, well I don't know I guess I had a brain fart or something. On a side note about my forgetfulness. Just yesterday I was making a batch of cookie, and I realized I forgot to put in 66% of the sugar! That's a not very sweet cookie! But anyways, these molasses spice cookies are delicious, and you should try them. But don't feel like I'm forcing you, cause I'm not. But really, they're really really good! :)

Don't they look mouthwatering? Maybe my photography isn't the best, but they do make your house smell amazing. It's like having a spice infused candle radiate from your oven!


Molasses Spice Cookies
Adapted from Flour
Ingredients:
3/4 cup butter, room temperature
1 cup packed brown sugar
1/3 cup molasses
1 egg
2 cups flour
1 teaspoon baking soda
1 teaspoon ground ginger
1 teaspoon cinnamon
1/2 teaspoon salt
1/4 teaspoon nutmeg
Sugar for coating

Directions:
1. In a bowl beat the butter and sugar until fluffy. Beat in molasses and egg.
2. In a separate bowl, whisk together the flour, baking soda, ginger, cinnamon, salt, and nutmeg
3. Mix the flour mixture in to the butter mixture
4. Place dough in an airtight container in the fridge for at least 3 hours
5. Preheat oven to 350˚F
6. Coat rounded tablespoons of dough in sugar, and then place on a cookie sheet
7. Bake for 14 minutes or until slightly firm to the touch
8. Enjoy!

Friday, December 10, 2010

Graham Crackers


Wow, I can't believe it's already December. December is always such a hectic, but fun month. It also means it's baking season! Woo hoo :0 Hawaii isn't the most ideal place to bake considering it's so hot, but in December I can bake all I want without having to turn on the a/c. It's great! I know it isn't as cold as the east coast, but it's still pretty cold here. A freezing 72˚F!

This is my first Christmas as a baker. Actually that's not true. It's my first Christmas as a baker blogging about the stuff she bakes. Uh, did that make any sense? But what I'm basically trying to say is that I'll probably post the recipes after the holiday season. I still have so many recipes to post from the fall season! Like these graham crackers. Actually, I think these would be good for Christmas too. Just wrap is up in a little package, tie a bow, and ta dah!, cute little homemade gifts! These graham crackers were soooo good. I'm not usually a fan of graham crackers (boxed ones *cough cough), but now I am a graham cracker cookie lover! They are crunchy little bites of cinnamon-y sugar-y crunchy goodness!

Graham Crackers
from smitten kitchen
Ingredients:
2 1/2 cups plus 2 tablespoons (375 grams) unbleached all-purpose flour
1 cup (176 grams) dark brown sugar, lightly packed
1 teaspoon (6 grams) baking soda
3/4 teaspoon kosher or coarse sea salt (4 grams)
7 tablespoons (3 1/2 ounces or 100 grams) unsalted butter, cut into 1-inch cubes and frozen
1/3 cup (114 grams) mild-flavored honey, such as clover
5 tablespoons (77 grams) milk,
2 tablespoons (27 grams) pure vanilla extract


1. Combine the flour, brown sugar, baking soda, and salt in the bowl of a food processor fitted with the steel blade or in the bowl of an electric mixer fitted with the paddle attachment. Pulse or mix on low to incorporate. Add the butter and pulse on and off on and off, or mix on low, until the mixture is the consistency of a coarse meal.

2. In a small bowl, whisk together the honey, milk, and vanilla extract. Add to the flour mixture and pulse on and off a few times or mix on low until the dough barely comes together. It will be very soft and sticky. Lay out a large piece of plastic wrap and dust it lightly with flour, then turn the dough out onto it and pat it into a rectangle about 1-inch thick. Wrap it, then chill it until firm, about 2 hours or overnight.

3. Roll out dough until 1/8 inch thick, cut as desired. Bake for 15-20 minutes at 350˚F. Cool and enjoy!

Tuesday, December 7, 2010

Peanut Butter Chocolate Chip Cookies

Yum. Peanut butter. I remember when I was in fourth grade I would eat a peanut butter and jelly sandwich everyday. Usually the ratio of peanut butter to jelly was way off, but it was still really tasty. There would be so much peanut butter compared to the jelly that it would stick to the roof of my mouth and I had to drink tons of apple juice to get it off! Eventually, I moved on from peanut butter and jelly sandwiches to peanut butter and chocolate sandwiches. Actually not chocolate, but nutella sandwiches. Doesn't it make your stomach rumble just thinking about nutella? I know mine does. Nutella was probably the greatest food I tried when I was nine. I thought it was amazing. Eating chocolate for lunch, And Breakfast? Sign me up!
Well I know there's a lot of recipes for chocolate chip peanut butter cookies, but today I was remembering my fourth grade year full of peanut butter sandwich lunches, and decided to make these peanut butter and chocolate chip cookies. They were amazing, and definitely satisfied my peanut butter sandwich craving. Oh, yea, I was craving a peanut butter sandwich but there was not bread. Sadness...
These cookies were yummy! Peanut butter dough with chocolate chips in every bite!

BTW! Don't forget to enter my giveaway!
Peanut Butter Chocolate Chip Cookies
Adapted from Flour
Ingredients:
1 cup butter, room temperature
3/4 cup sugar
3/4 cup brown sugar
2 eggs
1/2 teaspoon vanilla extract
3/4 cup peanut butter
2 3/4 cup flour
1 teaspoon baking soda
1/2 teaspoon salt
2 cups chocolate chips

Directions:
1. In a bowl, beat the butter and sugars until light and creamy. Beat in egg until combined. Add in the vanilla extract and peanut butter, mixing until combined.
2. In a separate bowl, whisk together the flour, baking soda, and salt.
3. Mix the flour mixture in to the butter mixture until combined.
4. Fold in the chocolate chips.
5. Place dough in a container, and place in the fridge for 3 hours, until slightly firmer.
6. Preheat oven to 350˚F
7. Drop rounded tablespoons of dough on a cookie sheet, bake for 13 minutes or until golden on the edges
8 Enjoy!


Saturday, December 4, 2010

Red Velvet Cupcakes w/ Cream Cheese Frosting!

I can't believe I've never made red velvet cupcakes before. I've bought them, I've eaten them, but I've never made them. That's very strange considering I spend my weekends baking instead of doing my homework. Yes, yes, I know, I really should start working on that darn three page essay for English. But moving on from the fact that I have no idea what I've doing for my English paper, I finally made red velvet cupcakes! While I was sitting in front of my laptop trying to think a topic, I started to daydream about food. This actually happens a lot. I initially start of doing the task at hand, but then I get bored and start to imagine what I would make if I could make anything. Usually when I'm at my laptop and I get bored, I scroll through pages and pages of delicious looking food pictures waiting to be inspired to jump off my chair (actually the ground) and run to the kitchen to make whatever dessert I start to crave. So while I was sitting on the ground (the carpet really-I don't like sitting in chairs, but that's for later.) trying to write my paper, my cursor eventually found its way over to the many bookmarked recipes I saved for those moments when I have no idea what I want to make but I want to make something. I call those recipes the "I have no idea what I want to make but I want to make something" recipes.

This red velvet cupcake recipe from Annie's Eats was perfect. I considered it a "I have no idea what I want to make but I want to make something" recipe, but now I think of it as a must make recipe. Actually, I've never made any other red velvet cupcake so I don't really know, but I thought they were delicious! Moist, not too sweet, and perfectly paired with the cream cheese frosting. Btw, cream cheese frosting is divine!
Do you see those little ball things on the cupcakes? They are edible! Everyone I shared them with had to ask me if they could eat them! It was really funny because when I told them they were, they would give me this look like "OMG REALLY?". It was hilarious!

BTW: Don't forget to enter my GIVEAWAY!

Red Velvet Cupcakes

From Annie's Eats
Ingredients:
For the cake:
2½ cups flour
1½ cups sugar
1 tsp. baking soda
2 tbsp. cocoa powder
1 tsp. salt
2 large eggs
1½ cups vegetable oil
1 cup buttermilk
1/2 tbsp liquid red food coloring
1 tsp. vanilla extract
1 tsp. distilled white vinegar

For the frosting:
8 oz. cream cheese
6 tbsp. unsalted butter, at room temperature
1 tsp. vanilla extract
 2 3/4 cups confectioners’ sugar, sifted

Directions:
1. Preheat the oven to 350° F and line two cupcake pans with paper liners.
2. In a medium bowl, whisk together the flour, sugar, baking soda, cocoa powder and salt.
3. In the bowl of an electric mixer, combine the eggs, vegetable oil, buttermilk, food coloring, vanilla and vinegar.  Beat on medium speed until well blended.
4. Mix in the dry ingredients on low speed and beat until smooth, about 2 minutes.
5. Divide the batter evenly between the prepared liners.  Bake until a toothpick inserted in the center comes out clean, about 18 minutes.  Let cool in the pans 5-10 minutes, then transfer to a wire rack to cool completely.

Frosting:
1. Combine the cream cheese and butter in the bowl of an electric mixer.  Beat on medium-high speed until well combined and smooth, about 2-3 minutes.
2. Mix in the vanilla extract.  Gradually beat in the confectioners’ sugar until totally incorporated, increase the speed and then beat until smooth.  Frost cooled cupcakes as desired


Wednesday, December 1, 2010

Maple Cinnamon Biscotti

My hand hurts. I just spent the last two hours hunched over my kanji book, scribbling kanji in to the super tiny boxes. Oh, how much fun that was (in a sarcastic voice). I have no idea why anybody would need three different types of writing. I mean, katakana is for "borrowed" words, hiragana is for, I guess non-borrowed words, and kanji, well kanji is just annoying. I mean, really? Do you really need to have another type of writing for words that be already written in a plainer form? Okay, maybe it looks a lot nicer and shortens words. Wait, no not always, sometimes there's about 15 strokes for one kanji, and the reading is just one syllable! Such a waste of my hand cramping!

Now moving onto other important matters besides my Japanese homework...these maple cinnamon biscotti! Biscotti are one of my favorite cookies. Mainly because they're so crunchy, and (well at least the ones I make) don't have any butter! Yea, I know some biscotti do, but I think the butter-free ones are better. They're crunchier! I combined two of my favorite fall flavors, maple and cinnamon, in to this crispy little twice baked cookies. They make the house smell delicious, and super fall-y? Uh, fall-y? is that a real word? Hm, maybe not, but basically these cookies are good.


Maple Cinnamon Biscotti  
Printer Friendly Version

Ingredients:
1 cup sugar
2 eggs
2 cups flour
2 teaspoons cinnamon
1/3 cup maple syrup

Directions:
1. Preheat oven to 350˚F and line a cookie sheet with a silpat baking sheet
2. In a bowl mix sugar and eggs.
3. Gradually add in flour cinnamon and maple syrup.
4. Half the dough, shaping each in to a log on the cookie sheet
5. Bake for 25 minutes or until lightly browned
6. Remove from oven, and being very careful, cut in to long slices about 1/2 inch thick
7. Turn each slice sideways and bake for 10 more minutes
8. Remove from oven, turn on to opposite side, bake for 10 more minutes
9. Remove pan from oven and cool
10. Enjoy!